Have you learned how to embroider and don’t know where to apply the untuck? Learn a new craft in which embroidery serves as the main decoration.
Despite new types of needlework, the interest of creative people in cross stitch does not wane. But if earlier they mainly embroidered items of clothing, household items and paintings, now, especially in connection with the rapid development of the Internet, other types of products have become available that can also be embroidered and serve not only as interior decoration, but also of practical benefit to their owner. One of these products is biscornue, a small pillow with big possibilities.
What is biscorn - a short introduction
The word “biscornu” comes from the French word biscornue, which translates as “two-horned,” “having protrusions,” “awkward,” “funny.” In fact, biscornu is a pillow whose edges are unequal and at the same time symmetrical. Reading such a description, you wonder: how can one be unequal and symmetrical at the same time? This is all the cunning, charm and creative intrigue!

Biscorn always looks unusual and bright. Almost every needlewoman whose heart and hands are close, having seen such an unusual thing, thought about how to sew biscorn with her own hands. And almost every needlewoman has in her arsenal a hand-embroidered pillow. How could it be otherwise - do you know how many needles embroiderers have? Where should you stick them, if not into a pincushion? Therefore, biscornu pads primarily began to serve as pincushions.
Classic biscornu pincushions can be of any size - a lot depends on the design and the chosen canvas size. Accordingly, the application can be different - from a huge pillow for sleeping, to a tiny pillow that will serve as a beacon for scissors or a keychain. Often they make biscorn on a loop - to decorate the interior or the New Year tree.
How to learn a new hobby
Basically, biscornia is embroidered with a cross. Sometimes they use beads and... Even if you are already familiar with these types of needlework, do not think that the first pillow will work out the first time, because it is not the one that needs to be folded correctly!

From theory to practice - what you need to create mini-masterpieces
For needlework you will need tools:
- scissors;
- embroidery needles - as a rule, embroidery is done with blunt-tipped needles;
- hoop (optional, it’s more convenient for someone to embroider).

And materials:
- threads;
- padding polyester;
- decor.
The question “how to embroider” is not worth asking for those who already have experience, but there are questions about what and on what.
For the pillow you will need embroidery pattern. The scheme can be chosen to suit every taste - thematic for a specific holiday, with flowers, ornaments or other themes.

Next, you need to decide on the background of the embroidery - this is usually indicated in the pattern or can be easily determined independently: if the pattern is on a white background, then you will need a white canvas, if the background is of some other color, then the canvas will need to be selected in the appropriate shade.

All needlewomen know that materials for creativity must be of high quality; the final type of work depends on this. So it is here: it is better to choose a high-quality, fairly rigid canvas from a German manufacturer, the optimal size is Aida 14.
They are sold in small pieces in craft stores. Biscorn on a hard canvas is quite convenient to embroider even without a hoop, and the product itself will ultimately look more embossed.
What threads are suitable for embroidery
Used for cross stitching. Most imported and domestic manufacturers have a fairly wide palette of colors; you can choose any one, depending on the price. It is extremely important that the threads do not fade when washing! After all, in order for the work to look neat in the end, the biscorn elements must be washed before assembly!
Based on practice, bestex floss, unfortunately, has this unpleasant quality. If you want cross-stitched biscorn to look bright and not fade when washed, then it is better to purchase floss from a French manufacturer.
This is not only the largest palette of colors, but also, if you suddenly run out of thread, a chance to get the right shade by buying a new paste. True, it turns out a little expensive.

Cotton wool or padding polyester – what to fill the pillow with
So, you already have canvas, floss, pattern and tools. What is missing? There is not enough padding polyester for stuffing.
You can fill the biscorn with pieces of holofiber - this material is also quite often found in craft stores, it is most often packaged in bags. You can use padding polyester - it will be cheaper.
It is beneficial to buy padding polyester by the meter; it comes out very cheap, lasts a long time and can be useful for other tasks if, for example, you want to do... But you shouldn’t use cotton wool for this purpose - it quickly falls off and the product becomes deformed.
Decor elements and features
As for jewelry for biscornu, for a classic pillow, buttons are most often used - two on each side, sometimes - beads, artificial or made of natural stones, and fur pom-poms. Sometimes beads are sewn not only in the center, but also at the corners. Occasionally, a loop is sewn onto the biscorn - knitted or made of ribbon, sometimes decorated with a brush.

To get an exclusive item, look for original buttons. Often it is a button that inspires the creation of biscornu, giving birth to an unusual design in the imagination.
The right start is half the battle
After the craftswoman has decided on the biscornu pattern and made sure that all the necessary tools and materials are available, it’s time to start cutting out the canvas. The classic biscornu consists of two square pieces of canvas. Along the borders of the future image on each piece of canvas, it is necessary to lay a “line” with a backstitch using a needle.

This seam is also done by hand. It is important not to make a mistake with the number of cells for the future image - neither a cell more nor a cell less. The embroidered picture on each square of the future biscorn should be symmetrical, like the pillow itself. An incorrectly marked field will lead to a noticeable distortion of the design and, ultimately, will negatively affect the appearance of the product.
The main secrets of mastery
There is no point in describing in detail the embroidery process itself - you will learn practical lessons from master classes on this topic. Let's move straight to the part when you already have two completed preparations for the future biscorn. It's time to reveal the secret of stitching!

Now it is important to correlate the two finished parts so that in the end, after assembly, you get a classic shape. To do this, the corner of the seam that you laid along the perimeter of one of the workpieces is connected to the middle of the seam laid along the other workpiece, like this.

And now - attention! When assembling a biscornu, it is not the fabric that is sewn, but two seams with each other over the edge. This not only makes it quite simple to assemble the product right from the front side, but it does not have to be turned inside out, as is the case with conventional sewing of fabric products.
Often people who see finished biscornu pads are surprised by this seam: many are convinced that such a seam can only be made on a sewing machine. And when you modestly report that you did it with your hands, in the eyes of this person you automatically become a top-level craftswoman!

Of course, when creating a biscorn for the first time, in order to do everything correctly and not be disappointed in the product, it is best to watch a video master class.
Once you have your pillow, it's time to choose decorations to go with it. As mentioned above, the choice is great - buttons, beads, tassels. Most often, such decoration is sewn on both sides through the middle, slightly tightening the finished product. And sometimes, if the pattern is suitable, you can leave the pad without tightening.
Such different biscorns
It must be said that in addition to the classic biscornu, there are other types of crooked ones. For example, fragmented.
Such pads consist of more than two parts, sewn together at the assembly stage. Here it is important not only to assemble all the parts into one product, but also to correctly rotate the squares in relation to each other.
Pentacles consist of 15 squares, which are sewn in three rows.

Sometimes they make embroidered biscorns in the shape of a “tulip”.

Berlingo biscorn is made from a rectangular piece of canvas, assembled in a special way.

“Pendybull” resembles a “heart” in appearance, and, like “Berlingo”, is made from a rectangular embroidered base.
The roller-shaped biscorn is most similar to a large candy and is often used as a New Year's decoration.

Zigugu is the smallest of the biscornu “family” of pillows and is made from a single square base.

How to preserve a masterpiece for many years
Of course, over time, any thing made of fabric becomes dirty. Biscorn can be washed by hand in warm water with regular detergents or in a washing machine on a delicate cycle.
If you made the biscorn yourself, it is important to be sure even at the embroidery stage that the threads will not fade and the filler will not fall off. Typically, cotton wool has this unpleasant property; synthetic padding, on the contrary, expands quickly and dries perfectly. You should not twist the washed biscorn, the threads may burst due to excessive force and then “cure” the product will be very problematic. Squeeze out excess water by lightly pressing the pad.

It is better to dry the needle bar away from heating devices, otherwise it may turn yellow. If the biscorn itself is attached to a rope with a clothespin, an unsightly mark may remain. The best way to dry it is to put the pad in a net for washing small items and hang it on a line in a warm room.

In conclusion, I would like to say that embroidered biscornu and other cute designs of all shapes, colors and sizes have rightfully found their place in the creative hearts of needlewomen. They even have their own Masters who create original patterns, as, for example, the beloved needlewoman Fabi Riley, beloved by many who are passionate about biscornu embroidery, does it.

How to make biscorn. Scheme and master class with step-by-step photographs.
Word " biscorn“came to us from France, but these trinkets have found their fans all over the world. Literally, this word, unusual for our ears, can be translated as “crooked,” “irregularly shaped thing.” However, the word “ biscorn“has long since entered the lexicon of needlewomen and no longer needs translation.
Creation biscorn- the activity is incredibly exciting! Don't believe me? Then try making this unusual pincushion with your own hands. By the way, it is not at all necessary to use biscorn only as a pincushion. You can fill it with fragrant herbs or coffee, and you will have a wonderful aromatic pillow.
First, let's decide on the necessary materials. I will say right away that the materials can be purchased either individually or in entire sets. If you are an experienced craftswoman, then the first option will suit you, since most likely some of the necessary materials will be found in your handicraft piggy bank. And if you are just starting to master embroidery, you can buy ready-made ones, in which you will find everything you need for work.
Materials and tools for creating biscornu.

- Floss thread according to the chosen pattern. If you plan to use the same pattern as in this master class, then you will need threads of two colors - red and green.
- A strong thread for tightening biscornu.
- Round beads of two colors: light green and bright red.
- Cross stitch needle.
- Canvas. In stores you can find canvas of different densities and compositions, white and colored.
- A little padding polyester or stuffing for soft toys.
- Two green beads with a diameter of 5 mm. You can use two small buttons if there are no beads.
For this biscorn one was used scheme: for both the front and the back. Sometimes the reverse side of the biscorn is left completely without embroidery.
So, on the canvas, embroider two square patterns according to the pattern. It is more convenient to start embroidering from the center of the design. Cross stitch using two strands of floss.
Now let's start sewing on the beads. Use sewing thread to attach beads as they are stronger than floss.
Once the design is embroidered, you can begin to decorate the details using backstitch stitches. They are also made with red floss in two threads. A stripe of back stitches is sewn around the perimeter of the design. These stitches are necessary to assemble the biscornu. It is important that the number of stitches on both parts of the biscornu matches.
Trim the edges of the canvas on all sides at a distance of 6 mm from the outer line of the back stitches.

Fold the edges of one of the squares (the one without beads) inward so that only the line of back stitches is visible from the front. Since we embroidered on canvas, this will not be difficult to do: the canvas bends easily and holds its shape.

We will sew both parts of the biscorn using two strands of red floss. Fasten the thread in the corner of the square without beads. On the top square, find the middle of one of the sides. This will be easy to do thanks to our drawing.

We pry the thread of the “back needle” seam on the upper part, pull the thread, then pry the thread of this seam on the bottom square. We sew only the seam threads, do not touch the canvas.

We get to the corner. Carefully fold the corner of the square with beads and sew it to the bottom.

This is what a biscornu looks like with the first corner sewn.

We continue to sew the squares. When sewing corners, be careful to ensure that the corner falls exactly in the middle of the side of the other square.

We sew until one side remains unsewn. We stuff the biscorn with padding polyester or some other filler.

We sew up the hole and hide the “tail” of the thread. We got a nice three-dimensional figure. However, for the biscornu there is one piece missing - it needs to be pulled together in the middle.

To tighten, we need a strong thread (preferably to match the beads or buttons with which we will tighten) and a needle for sewing soft toys.
We thread the thread in two folds into the needle, pierce the biscorn in the center and pull the thread so that a loop remains at the bottom.

We step back one cross and pierce the pad again, insert the needle into the loop from below and tighten. Now we put a bead on the needle and pierce the biscorn again. We repeat the same action on the opposite side.

After the beads are sewn, fasten the thread and hide the “tail”.

The biscorn is ready!
Happy crafting! With best wishes in your creativity, biscornu author Anna Lavrentieva.
This master class was written specifically for the site, so copying the entire material is PROHIBITED!
When partially copying, be sure to include a link to the source.

Lately, more and more people have become interested in some kind of art: some paint pictures, some sculpt from clay, and many girls and women have become interested in such art as embroidery. There are a large variety of embroideries: cross stitch, satin stitch, Richelieu embroidery, ribbon embroidery, embroidery of products with beads and beads.
Knowledgeable, experienced embroiderers can put their skills into practice not only by creating paintings, but even to decorate clothes and rooms. Embroidery will add elegance and zest to clothes; it can make even the simplest T-shirt a unique thing. In addition, with the help of embroidery you can create beautiful and stylish decorations for your home. Handmade products such as biscorn are coming back into fashion.
This product of craftswomen came to us from the culture of France. And it is divided into several types: standard biscorn, Berlingo, pinkin, pendbull, zigugu. So, what is biscorn?

This is a voluminous product that can have a variety of sizes:
- 30x30 crosses;
- 40x40 crosses;
- 70x70, etc.
Most often these are small sizes. Biscornu is embroidered with a cross or beads.
In order to create an embroidered biscorn, you need:
- Two identical squares of canvas;
- Floss threads or cotton threads;
- Embroidery needles.
- Scheme of the future product.
You should decide on the scheme in advance. It can be anything, it all depends on your imagination and, directly, on the purpose of the product.
In addition, to create biscorn you do not need any specific equipment or courses; you can learn everything on your own. A master class is perfect for this purpose. Thanks to them, you can not only learn from the experience of other craftswomen, but also choose for yourself the most optimal style of working on a product of this type.
How is biscornu made? First of all, you should mark the canvas squares prepared in advance. This will make it easier to embroider. Next you need to embroider the pattern or design you have chosen. After completing this stage, you should wash the embroidered squares.
Then we sew both squares together, leaving one part of the product unsewn. Fill the resulting bag with cotton wool or padding polyester. Sew the remaining part. You can also sew a loop of ribbon to the finished one from a distance.
Biscornu cross: patterns of New Year's motifs
Often, a handmade product such as biscorn is used as interior decoration, including for holiday decorations. Since biscornu embroidery can be of any theme, many housewives even decorate the Christmas tree with such products. Embroidered biscorn is a good alternative to Christmas balls and toys.
Due to the fact that biscornu can be of very different shapes, the tree and the interior will look even more interesting.

For example, you can create embroidered biscorns in the following shapes:
- Star;
- Crystal;
There are a large number of New Year and winter themed patterns, you can download them for free to suit every taste and the colors you need.
Original biscornu cross stitch: new patterns in monochrome style
For a long time, biscornu was made by combining a large number of thread colors. However, now it is quite popular to embroider handmade items in the monochrome style, i.e. the entire design or pattern is made with thread of the same color.
These can be completely different colors:
- Black;
- Red color;
- Green and its shades;
- Blue, as well as the whole range of shades, etc.

When working with embroidered biscornu in the style of monochrome embroidery, you should select threads either in the color of the main material, but lighter or darker, or threads that contrast with the main material. For example, an embroidered pattern made in red looks good on a black background. In addition, monochrome embroidery is reminiscent of the embroidery on the shirts and belts of our ancestors, i.e. This kind of biscorn can serve as a good amulet, because it can also be worn around the neck as a decoration.
Thus, new patterns for biscornu embroidery are now mostly monochrome patterns.
Schemes for cross biscornu: floral paintings
Floral motifs are used quite often in biscornu embroidery. Such products can be used both as individual accessories and as decorative interior elements to create a cozy atmosphere in a home or any other non-residential work space; in addition, many people use similar products with floral prints as pincushions in their creative life.

How accessories embroidered in biscornu floral style can be used:
- Like a pendant around your neck;
- In the form of decorations on the strings of children's hats;
- As a keychain for a woman's handbag or backpack.
One of the popular images of flowers recently has become the poppy. These red flowers blend harmoniously with the curved shape of the product.
Now you can find a large number of free embroidery patterns for biscornu, depicting poppies in various forms: blossoming, closed in the form of buds, and so on.
Biscornu: cross stitch patterns (video)
In addition, it is worth mentioning that the color scheme of poppy flowers goes well with almost all colors of the base material.
The French gave the pretty product such an unusual name from our Russian-speaking point of view for a reason. "Biscornu" means "uneven, irregularly shaped." In some cases, this term is translated as “funny, funny.” And in fact, biscorns turn out to be quite spectacular precisely because of their absurdity and deviation from the standard. Russian craftswomen have come up with and widely use another name in everyday life - “krivulka”. It expresses the warm-hearted attitude of needlewomen towards this type of decorative items.
So, what is biscorn? This is a three-dimensional thing, consisting of two symmetrical halves of various shapes, most often embroidered with a cross. Rhinestones, buttons, beads, sequins, and beads are also used to decorate the product. Often, perky tassels or pom-poms are attached to the corners. Krivulki are used mostly as needle beds and beacons for scissors. But it is not forbidden for embroidered pillows to serve as a gift souvenir or a decorative interior detail. Particularly resourceful craftswomen include biscorn in textile jewelry, for example, crocheted or knitted, and decorate the Christmas tree with it for the New Year. For practical people, the krivulka serves as a keychain or a pendant for a cell phone.

Types of biscornu
Biscornu can be:
- standard;
- fragmentary
- five-blade.
The classic version of the biscorn pillow is embroidered, often with a cross. It may well be embroidered in satin stitch, but the manufacturing technology requires it to be sewn in a certain way along the seam. The seam itself is also specific and requires counted fabric. Against the background of a pattern embroidered with satin stitch, such a seam will look too rough. If an uneven pad is made from pieces of various fabrics, it is already patchwork and has little to do with biscorn. It is quite possible to use any other embroidery technique on the marked squares. The main thing is that the patterns combine well with each other and create the illusion of a fancy pattern. Most often in biscornu it is either the illusion of a crooked mirror or an optical spinning of the pattern, which is achieved by turning the embroidered elements over and stitching them offset. The seam in such products must be tight and strong, since it is the sheathing of the circuit that holds the individual elements.


Standard
The simplest, but no less elegant, crooked pillows are made from two squares.
Each square is sewn with a special seam. The most common choice is a thick stem stitch. In this case, the thread should be tightened so that the thread does not hang down and runs tightly along the base. In this case, do not tighten it to the point of folds in the fabric.
Patterns for embroidering squares are most often chosen to be the same. When making the simplest biscornu, embroidery is done symmetrically and in a cross pattern. After both squares are ready, they are sewn together.
The main point in sewing biscorn is to correctly attach the parts to each other. Put face to face. The angle of one square to the center of the second. You should sew not at the fabric - the basis of the embroidery, but at the threads of the stem seam. This way the squares become more convex, and the pad takes on its unusual shape.
When the seam reaches the corner, the corner of the first square is level with the middle of the side of the second. There is no need to turn anything inside out, since the biscorn is sewn right along the front side, regardless of the pattern embroidered on it. When there is a short distance left until the seam is completed, we stuff the pad. This should not be done
too tight, but also do not make the stitched product empty, since after stitching, the pad must be pulled together in the center. When the pad is stuffed and the seam is completed, several layers of thread are passed through the central part of the biscornu. Sew 2 identical buttons in the center of the top and bottom. The biscorn is ready.
Fragmental
 These biscornues are somewhat more complex. They consist of more elements. Here the circuits for the elements can be completely asymmetrical, this will not affect the result. Embroidery of fragments is done on squares of equal size. You will need 8 of them. First you need to sew 4 squares together. To do this, each square is rotated, as if a photo is being rotated on a monitor. The first square is sewn to the second, rotated 90 degrees. Sew standardly - corner to corner, side to side and only one side. The third square is turned 180 degrees and sewn with the top side to the bottom of the second square. The fourth square is turned 270 degrees and sewn with the top side to the side of the first, and the right side to the side of the third square. This will create a square in which the selected embroidery seems to be reversed - the highest class, significantly confusing the viewer who does not understand the intricacies of creating such products.
Cross-embroidered pillows are always popular, because they indicate the desire to decorate the room and surrounding objects and the time spent on it. Biscornu also requires a certain dexterity when assembling and forming a pattern.
When two squares are ready, on each of them the embroidery turns in a circle as if under a kaleidoscope, they need to be sewn together. This seam connects the corner of one square to the side of the second. This is how you get a biscorn, on both sides of which the embroidery seems to scroll towards the center. Without finishing the seam by 2 cm, you should stuff the pad. After it becomes sufficiently dense, the seam should be closed. The finished biscorn must be pulled together in the center with several stitches, and identical buttons must be sewn into the center.
Five-blade
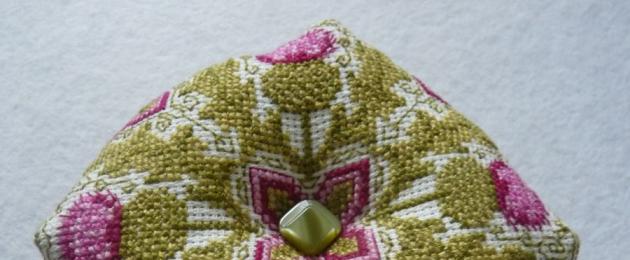
A particularly complex one is biscornu, which is often also called banurukotti. Sewing this kind of biscorn is surprisingly difficult. It’s not as difficult as it is troublesome, and if it works, a new biscornu maker is ready. The main thing here is attention and accuracy. In the photo, such a pillow may seem round, embroidered with some unprecedented tricks.
 This biscornu consists of three rows of embroidered elements. The cross stitch on each of them may be different. Ideally, these are 3 asymmetrical schemes. Each square of the upper part will carry one design, the side one will carry another, and the lower part will either have a design of the upper part or a completely different one. You can embroider all 15 squares with the same patterns, but this will make the biscorn too simple.
We turn 5 squares with the same, preferably asymmetrical, pattern at one angle to the center. We sew the first square to the second by the sides, the second to the third, etc. We sew the last square to the first. This is how we get the upper part of the biscornu with five protruding corners. Each square is connected to two adjacent ones by a side and they are all connected in the center by corners. We assemble the lower part in the same way. Carefully lay out the remaining parts so that they lie strictly in the same order. The main feature of biscornu, with all its apparent asymmetry, is symmetry and repetition of motifs.
The five-blade is formed not from two, but from three planes. Therefore, after forming two surfaces, we proceed to sewing the side. Each fragment of the side surface is sewn with its sides to two adjacent squares and an angle into the connection of their corners. This creates a cross with three corners. The next side square is sewn between the next two top pieces. As a result, a series of side squares seem to lift the top canvas. In the photo it looks like a huge fluffy flower with two types of petals.
Once the side is sewn, the resulting piece is sewn to the bottom. It should be sewn in such a way that it is not noticeable which part the side parts were sewn to first. 2 cm before the end of the seam, you should stop, thoroughly fill the biscorn with filler and complete the seam. We pull the thread through the center and make several tightening stitches. We sew a beautiful button on each side of the resulting biscorn.
Unusual biscornu

Biscornu "Tulip"
If the five-blade is an unconventional, but quite often used form of biscornu, then sometimes even exotic forms are found. The base may not be square, but six or even octagonal. And by sewing it using the biscornu technique, you can get absolutely fabulous beauty. Such biscornu do not have a separate name, they are little known and quite difficult to make, although the result justifies such an investment of labor and time. No matter how many corners and sides there are, you can always slightly turn the product by connecting the corner of one of them with the side of the second. In such biscorns, you need to carefully count the number of corners so as not to forget to sew on any of them. When stuffing such biscorns, you should pay attention to each corner so that they all protrude evenly, you need to push a piece of stuffing into each corner, and only after that fill the core. This way the biscorn will have a regular and symmetrical shape.
And although patterns for biscornu mostly involve cross stitch, they can also be used with bead embroidery, bargello, and semi-cross stitch.
 There are also very funny triangular biscorns. Moreover, they can be created from two triangles, when the upper and lower parts consist of one solid triangle. In the second case, each part of the triangle consists of three separate triangles. It turns out to be a sophisticated biscornu made from six small triangles. Here the location of the drawing on each element depends solely on the imagination that the master will show.
Biscornu requires:
- choice of pattern;
- the symmetry created (you need to decide whether the symmetry will go through the drawing itself or will be created by connecting elements);
- choosing the shape and number of elements that make up the biscorn.
You can choose a shape based on the pattern, or you can select a composition to match existing trinkets. You can start with the lightest model, or you can immediately show your class and create such a multifaceted and elaborate miracle of handicraft creativity that those who see it will simply gasp in surprise. You shouldn’t be afraid of biscornu’s creations, it is made quite simply, but it looks original, attractive and always unusual, violating traditional views on the symmetry of things. Such products are always used in everyday life and as decoration, and their manufacture will bring many vivid impressions.
VIDEO TUTORIALS: how to sew biscorn
- In contact with 0
- Google+ 0
- OK 0
- Facebook 0